Sidebar
CAMERA CHARACTERISTICS
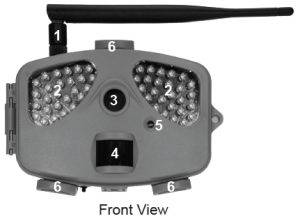
1. Antenna: Standard antenna shown receives cell tower signals. Our 5 decibel booster antenna is available as an accessory for operation in low signal areas.
2. IR Illuminators: Twin banks using 52 infrared LEDs that illuminate the target area when camera functions at night.
3. Camera Lens: The camera lens has a 52 degree field of view with no magnification. This enables users to observe a 20’ field of view measured 15’ from the lens and a 32’ field of view when measured 21’ from the lens.
4. PIR Sensor: Passive Infrared motion detector. Senses the presence of a moving object which triggers the camera to take a photo or record a video.
5. Ambient Light Sensor: Detects surrounding light to automatically control day and night camera functions. This sensor also emits a red, blinking LED when the selector switch is moved to SETUP. The LED will stop blinking within 10 seconds after the selector switch is moved from SETUP to ON indicating the camera is operational and active.
6. Locking Latches (3 each): Secures the camera front housing to the main body housing while providing a waterproof seal to internal components.
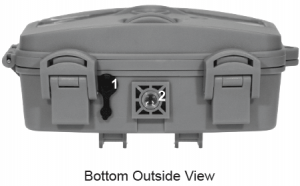
1. Transmitter Port Plug: Waterproof seal to protect internal components when transmitter is not in use.
2. Mounting Port: 1/4 x 20 internal threads for securing camera to a T-Post mount. Only thread external devices two complete rotations into the camera mounting port then tighten using the mount’s adjusting nut. Forcing external threads to the bottom will damage mounting port and camera housing.
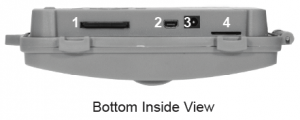
1. SD Card Port: Slot for receiving an SD card. The camera has no internal memory. An SD card smaller than 32GB must be used to store photos, video and GSM data.
2. USB Port: Standard USB cable connection interface to transfer information between the camera and a computer.
3. Transmitter Port: Transmitter slot for wireless SMS cellular control of the M.I.N.E Gate and control box.
4. SIM Card Port: Slot for receiving a cellular SIM card from GSM network providers such as AT&T and T-Mobile.
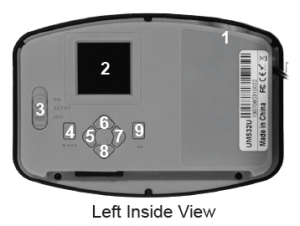
1. Antenna Port: Attachment point to install various antennas depending on local cellular strength. Our 5 db booster antenna is available as an accessory for operation in low signal areas.
2. Display: Screen to observe menus, photos and settings.
3. Selector Switch: Used to enter into any of the three operating modes: OFF, SETUP and ON.
4. Menu Button: Used to select various camera options.
5. Move Left Button: Moves from the highlighted area to a selection left.
6. Move Up Button: Moves from the highlighted area to a selection above.
7. Move Right Button: Moves from the highlighted area to a selection right.
8. Move Down Button: Moves from the highlighted area to a selection below.
9. OK Button: Selects the highlighted item.
There are 4 main menu tabs; CAM, PIR, GSM and SYS.
• Press the ![]() or
or ![]() buttons to change tabs when highlighted
white. Press the ▲ or ▼ buttons to cycle through the tab
settings. Press
buttons to change tabs when highlighted
white. Press the ▲ or ▼ buttons to cycle through the tab
settings. Press ![]() or
or ![]() to select items with white highlights
to view the choices. Press OK to save the new setting which
will change the highlight to red. Press ▲ or ▼ to view the next
setting. Cycle to the top ▲ of the tab (no white highlights)
before able to cycle
to select items with white highlights
to view the choices. Press OK to save the new setting which
will change the highlight to red. Press ▲ or ▼ to view the next
setting. Cycle to the top ▲ of the tab (no white highlights)
before able to cycle ![]() or
or ![]() to view or change another tab.
to view or change another tab.
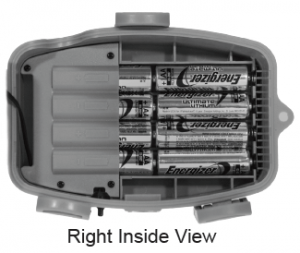
Battery Polarity Symbols: Located on the front of the battery tray. Aids in proper battery polarity and installation.
.
Page Tools
