Sidebar
CAMERA DEPLOYMENT
Align the 1/4 by 20 threads of the T-Post mounting bracket to the camera
mounting port. Thread the mounting bracket no more than three complete
rotations into the camera mounting port. Then tighten using the adjusting
nut. Forcing external threads to the bottom will damage the camera
mounting port and the camera housing.
Never mount the M.I.N.E.™ Cam on the same T post securing a trap
panel or severe damage may result. Always mount the M.I.N.E.™ Cam
on a separate 8 foot long T post at least 12 to 24 inches outside the trap
enclosure. Lower the square collar at a diagonal over the T post spine
and studs, then lower into position between two studs. Insert the mounting
wedge between the T post spine and square collar. Install the thumbscrew
into the 1/4 by 20 threads on the mounting wedge. Tighten the thumbscrew
against the T post spine to secure the camera mount.
Users are able to receive a wider field of view by mounting the camera at a
higher elevation. Lower the square collar at a diagonal over the T post spine
and studs, then lower into position between two studs. Insert the mounting
wedge between the T post spine and square collar. Install the thumbscrew
into the 1/4 by 20 threads on the mounting wedge. Tighten the thumbscrew
against the T post spine to secure the camera mount.
When mounting using the higher elevation method, it is easier to attach the
booster antenna (if needed) to the camera while on the ground. Remove
the standard antenna from the camera’s antenna port. Carefully thread the
booster antenna cable to the antenna port and tighten. Slide the rubber
waterproof boot over the booster antenna cable connector.
Drive a second 7 foot long T post into the ground approximately 12 inches
to the right and rear of the camera T post to attach the antenna pole. Secure
the 8 foot long T post with camera to the 7 foot long T post using zip ties.
The higher camera elevation will allow the booster antenna to exceed 20 feet
by elevating and securing the telescoping pole to the T post with zip ties.
Standing on a step ladder, align the M.I.N.E.™ Cam by loosening the ball
head set screw and centering the camera’s view to the ground beneath the
feeder legs. Tighten the ball head set screw to secure the camera’s position.
Move the selector switch from OFF to SETUP. The screen will display
“Searching Network”. The camera has successfully acquired a cellular signal
when the service provider’s initials appear on the display. Move the selector
switch from SETUP to ON. Close and latch the camera within 10 seconds
before the Ambient Light Sensor LED stops blinking green and the PIR
triggers a photo. The M.I.N.E.™ Cam is now operational and active.
Secure the 6 volt external power supply to the camera mount with the battery
bracket. Open the camera DC external battery port and insert the battery
cable plug into the camera for extended, long-term operation.
Ensure the camera PIR triggers and sends a photo to your cell phone. This
step will verify the camera is positioned and programmed correctly. Ensure
the feeder is centered and the entire gate opening is visible.
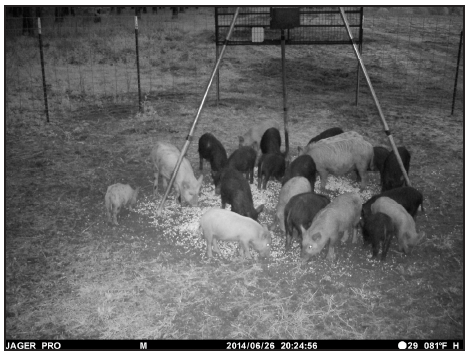
From left to right- JAGER PRO is the camera manufacturer. The “M”
indicates the photo was triggered by “Motion”. The letter “S” would indicate
a photo triggered by SMS code *500#. “P” would indicate a photo triggered
by “Time Lapse” and “E” would indicate a manually triggered photo using the
camera’s OK select button during SETUP.
The date is 26 JUNE 2014. The time is 2024 or 8:24 in the evening. It is a
new moon with 29 more nights until the next new moon. The temperature
is 81 degrees Fahrenheit. The battery symbol is “H” which indicates the
batteries are at a high charge.
The final step is to register your new equipment on the JAGER PRO website
via the camera IMEI number so we may provide appropriate firmware
updates. These updates are necessary to ensure your equipment operates
efficiently as network wireless technology changes. Multiple cameras
and control boxes may be registered on a single submission by following
directions in your Quick Start Guide.
If you have any questions, refer to the JAGER PRO™ M.I.N.E. & I.C.E. (3G) Camera Operations Video at the 20 minutes and 08 seconds mark, CAMERA DEPLOYMENT for more information.
.
Page Tools
